I remember standing in my backyard a few years ago, staring at a patchy lawn that did absolutely nothing except require mowing every two weeks. About 800 square feet of wasted potential. A neighbor had just handed me a zucchini the size of a small baseball bat from her garden, and I thought — why am I not doing this?
So I started. And I made every beginner mistake you can imagine.
I over-watered. I underestimated how much space chickens actually need. I built a raised bed in a spot that got maybe three hours of sunlight a day and wondered why nothing grew. I killed a perfectly good batch of herb seedlings by transplanting them on a 95-degree afternoon without hardening them off first.
But after grinding through those mistakes — and talking to people who had already figured this out — I landed on five backyard farm setups that genuinely work. Not just on paper. In real life, in a real backyard, with real imperfect conditions.
Here they are.
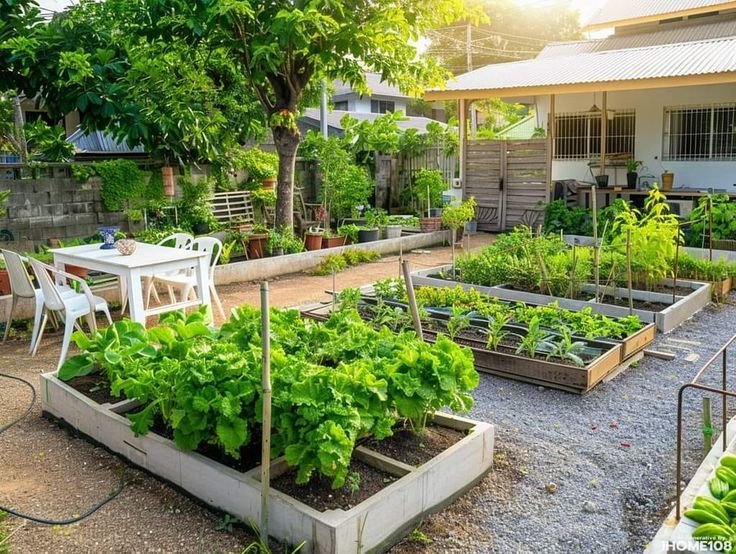
1. The Raised Bed Garden System — Your Best Starting Point
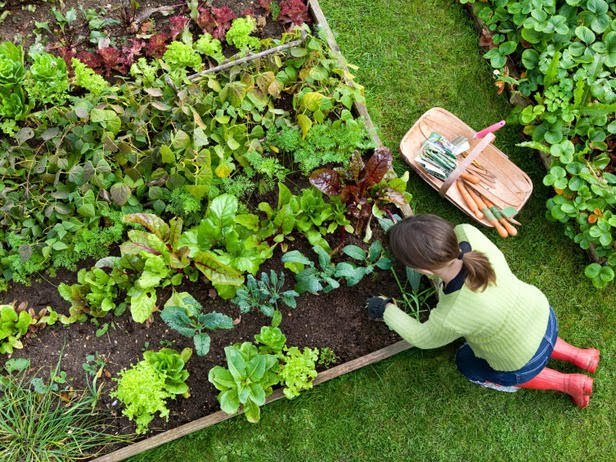
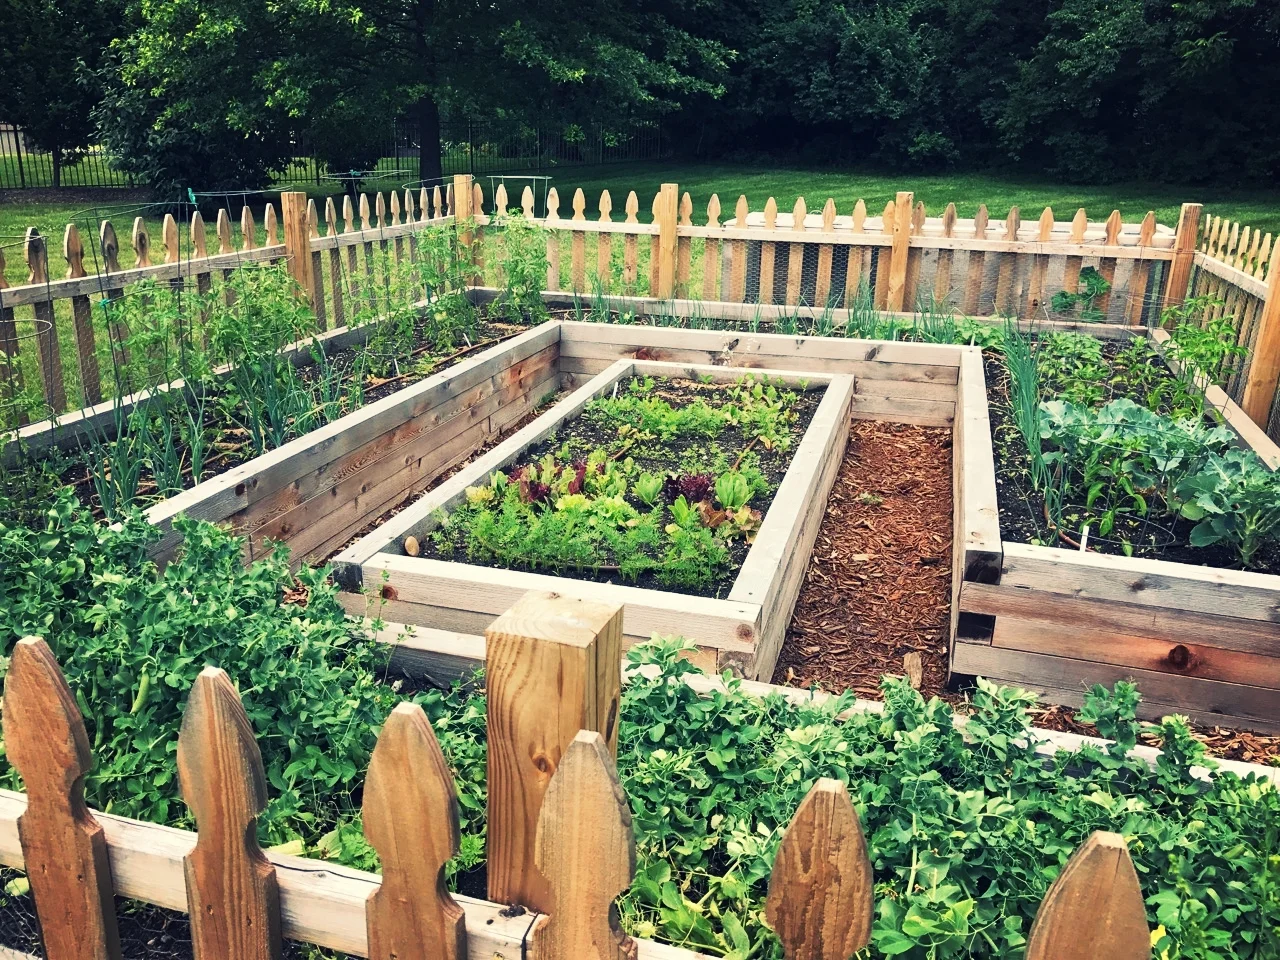
If you’re just starting out, stop overthinking it and build raised beds. This is the single most reliable first move for backyard farming, and I wish someone had just told me that plainly at the beginning.
The reason raised beds work so well is control. You’re not fighting your native soil — whatever it looks like, whether it’s clay-heavy, rocky, or just sad. You fill the beds with your own mix, and you’re in charge from day one.
My first setup was two 4×8 beds built with untreated cedar planks. Cedar is worth the extra cost — it holds up for years without rotting and doesn’t leach anything into your food. I filled them with a mix of topsoil, compost, and a little aged manure from a local feed store. Total cost was around $180, including hardware.
What I grew that first season: tomatoes, lettuce, kale, radishes, and basil. The radishes were ready in 25 days. The lettuce was going strong by week five. The tomatoes took longer — closer to 75 days — but the payoff was real.
A few things I learned the hard way:
Sunlight is non-negotiable. Raised beds need at least 6 hours of direct sun. I placed my first bed near the fence, thought it looked nice, and got almost nothing out of it. Move the beds to wherever the sun actually is, even if it means the backyard looks less tidy.
Spacing matters more than you think. Seed packets give you spacing guidelines — follow them. I crammed tomatoes too close my first year and ended up with a fungal mess by August.
Water consistently. Inconsistent watering causes problems like blossom end rot in tomatoes and bitter lettuce. A drip irrigation timer from Amazon (I used the Rain Bird brand) made a massive difference once I added it. About $35 and it basically runs itself.
For deeper guidance on what to plant and how to arrange your beds, this guide on smart raised bed layouts is genuinely one of the most practical things I’ve found online.
2. Backyard Chickens — The Setup That Keeps Giving
Chickens are polarizing in the backyard farming world. Some people love them immediately. Others try them once and never go back. I fall firmly in the “worth it” camp, but only because I went in with realistic expectations.
The appeal is real: fresh eggs almost every day, built-in pest control (they eat bugs and weeds), and some of the best garden fertilizer you’ll ever have access to. Chicken manure, once composted, is nitrogen-rich and transforms tired soil quickly.
But the setup matters enormously.
My coop holds four hens — two Rhode Island Reds and two Easter Eggers. That’s the right scale for a small backyard. Four hens produce roughly 20–24 eggs a week in peak laying season, which is more than enough for a household and enough to share with neighbors (which builds a lot of goodwill, by the way).
Here’s the basic setup checklist I’d give anyone starting:
- Coop with at least 4 sq ft per bird inside
- Run space of at least 10 sq ft per bird outside
- Predator-proofing (hardware cloth, not chicken wire — raccoons can tear through chicken wire)
- Automatic waterer and feeder to reduce daily labor
- Nesting boxes — one box per 3–4 hens is enough
The coop I built cost me about $400 in materials over a weekend. There are cheaper ways to do it, and there are plans everywhere online, but I’d avoid going too cheap on the predator-proofing. I lost two birds in my first season because I underestimated how persistent a determined raccoon is.
Also worth knowing: check your local ordinances before you buy birds. Some areas restrict roosters (for noise reasons) or limit the number of hens. Most suburban areas now allow a small flock of hens, but it varies.
For breed selection, if you want consistent layers that are also calm around kids, I’d point you to this beginner-friendly breakdown of chicken breeds — it saved me from making a bad breed choice early on.
3. Vertical and Container Growing — When Space Is the Problem
Not everyone has 800 square feet. Some people are working with a narrow side yard, a patio, or a balcony. This is where vertical growing and containers become the hero of the story.
I converted a 6-foot section of my fence into a vertical herb wall using pocket planters and a couple of PVC pipe towers. The entire setup cost me under $60 and now produces more basil, mint, parsley, and chives than my household can realistically use.
The trick with vertical growing is matching the plant to the system. Deep-rooted plants like tomatoes and carrots don’t love shallow containers. But herbs, lettuce, spinach, strawberries, and green onions? They thrive in vertical setups.
What actually works well in containers:
- Lettuce and spinach (fast, shallow roots, harvest in 4–6 weeks)
- Cherry tomatoes (use a 5-gallon bucket minimum)
- Peppers (heat-lovers that do great in dark containers that absorb warmth)
- Herbs — especially mint, which you actually want in a container to prevent it from taking over your yard
- Microgreens trays (fastest return of anything — ready in 7–21 days)
One mistake I made with containers: I used cheap potting mix and skimped on drainage. Roots drowned. Now I mix in perlite to improve drainage and I make sure every container has holes at the bottom.
For watering, containers dry out fast — sometimes daily in summer heat. Self-watering containers (the kind with a reservoir at the bottom) changed everything for me. Cheaper than a drip system and surprisingly effective.
If you want ideas for making the most of a tiny yard, this resource on vegetable beds for small spaces has solid layout ideas that actually translate to real small backyards.
4. Rabbits — The Underrated Micro-Livestock Setup
This one surprises people. Rabbits don’t get talked about as much as chickens, but they might actually be the better fit for small-space farmers who want to produce meat.
Here’s why rabbits work so well in a backyard context:
- They’re quiet (no noise complaints from neighbors)
- They reproduce quickly if you go that route
- Their manure is cold — meaning it goes directly into garden beds without composting first and won’t burn plants
- They’re relatively easy to keep and handle
I kept three does and one buck for about two years. The setup was simple: stackable wire hutches, a gravity-fed water system, and a hay feeder. Total investment was around $280.
The rabbit manure alone paid for itself many times over. I stopped buying bagged fertilizer entirely. One rabbit produces about a pound of manure pellets per day, and my garden beds responded noticeably within a single season.
The setup reality check:
Rabbits are not no-work. They need daily feeding, fresh water, and regular manure cleanup — otherwise hutches get ammonia-heavy fast. In extreme heat (above 85°F consistently), they need shade and sometimes frozen water bottles to prevent heat stress. In my climate that was manageable. In hotter, more humid climates, rabbit keeping gets harder.
Also: if you’re raising rabbits for meat, you need to be honest with yourself about whether you can process them. If that’s not something you’re willing to do, rabbits still make excellent manure producers and low-maintenance pets that serve a farm function.
This guide on raising rabbits in small yards covers the specifics better than I can in a single section, including cage sizing and breed selection.

5. Smart Water Systems — The Setup Nobody Talks About Enough
Every backyard farm eventually hits the same bottleneck: water management. Whether it’s forgetting to water, watering too much, or dealing with a water bill that climbs in summer, the watering problem is real.
The good news is that a smart water system doesn’t have to be expensive or complicated. My current setup has three components:
Rainwater collection. I have two 55-gallon rain barrels connected to my downspout. After any decent rain, they fill up and that water goes directly to my garden beds for free. Total cost was about $80 for the barrels and connectors. In a good rainfall year, I probably cut my outdoor water use by 20–30%.
Drip irrigation with a timer. I run quarter-inch drip lines from a manifold at my outdoor spigot to each raised bed. The timer (a basic dual-outlet model by Orbit) runs for 20 minutes every morning. Plants get consistent moisture at the root level, not from overhead — which reduces fungal problems. Setup cost me about $120.
Mulching. This one is free and dramatically reduces evaporation. I layer 2–3 inches of wood chip mulch over all my bed soil. It keeps the soil cooler, reduces watering frequency, and breaks down into organic matter over time. My local tree service drops chips off for free — it’s worth asking around.
Together, these three things work as a system. The rain barrels feed the drip lines during dry stretches, and the mulch means water stays in the soil longer. I’ve gone on week-long trips without worrying about my garden dying, which was not possible before I set this up.
For deeper water-saving strategies specific to small farms, these backyard water-saving tricks are worth a read — especially if you’re in a drier climate.
Common Mistakes to Avoid Across All Setups
After a few years of running different pieces of this, here are the mistakes I see new backyard farmers make most often:
Trying to do everything at once. Pick one setup, get comfortable with it, then expand. I started with raised beds, added chickens the following spring, and only added the water system in year three. Doing it all at once is overwhelming and expensive.
Ignoring local rules. Chickens, rabbits, water collection, even some fencing heights — all of these can be regulated locally. Check before you build.
Underestimating time commitment. Backyard farming is genuinely not passive. Chickens need daily attention. Gardens need regular weeding and watering. Rabbits need daily feeding. Budget your time honestly.
Planting the wrong things for your climate. Zone matters. If you’re in a warm climate, you can grow nearly year-round. If you’re in a short-season northern area, cool-season crops become your best friends. Know your last frost date and work backward.
Skipping soil testing. I resisted doing a basic soil test for two years. When I finally did it (through my local cooperative extension — cost me about $15), I found out my native soil was too acidic and low in calcium. Two easy fixes — lime and crushed eggshells — made a visible difference.
Where to Go From Here
The hardest part of starting a backyard farm isn’t the physical work — it’s making the first decision and following through. Every setup here is one that real people run in real suburban backyards with real constraints.
Start small. One raised bed. A few containers on a patio. A trio of hens if your zone allows it. You don’t need a full farm on day one. You just need to start.
The beauty of backyard farming is that every piece you add makes the whole system more productive. Chicken manure feeds the garden beds. Garden waste feeds the rabbits. Rainwater feeds everything. It starts to close on itself into something that actually makes sense.
And once you taste a tomato that came out of your own bed, or crack an egg your own chicken laid that morning, the whole thing takes on a different meaning. That’s not something I can explain adequately — it’s something you have to experience.
Also worth reading: If you’re just finding your footing and want a structured starting point, check out these easy setup steps for beginners — it’s a practical walkthrough that picks up right where this article leaves off.